Using recast-cli
Overview
Teaching: 10 min
Exercises: 30 minQuestions
What kind of input does
recast-cliuse?What output can I expect from
recast-cli?Objectives
Learn how to use the
recast-clitool to perform a reinterpretation.
Introduction
Now we’ll take a look at the other recast tool: recast-cli. Unlike recast-atlas, recast-cli does not use ATLAS analyses in their original form. Instead, it uses ‘shortcuts’ such as fast simulation, that speed up the results, but are not quite as accurate. This also means that events are generated and simulated as part of the recast-cli workflow, rather than through the ATLAS derivation system.
So, if it’s less accurate, why should we use it? The primary use-case for recast-cli inside of ATLAS is at the early stage of a reinterpretation. Creating a signal grid of full simulation samples is expensive, so you would like to make sure that you select useful points in phase space. recast-cli can help quickly confirm that the points you’ve selected are interesting, or perhaps indicate that you should move in a different direction (either by selecting a different signal grid, or using a different analysis).
Fast Simulation
The principal motivation for
recast-cliis the use of fast simulation. Fast simulation uses kinematic smearing or other techniques to simulate detector effects, rather than going through a full geant-4 emulation (see rivet for more details).
Installation
Using docker
A recast-cli docker image for this tutorial is available on docker hub at: https://hub.docker.com/r/recast/workflow. Simply run:
docker run --rm -it recast/workflow:latest bash
Using pip
Python virtual environments
There are many ways of managing Python packages. Most people in the Physics community use conda, but there are other options such as pipenv, venv, and poetry. It is best practice to install any Python packages within a virtual environment controlled by one of these systems, rather than using the base Python environment on your machine.
In your favorite python virtual environment, run:
git clone https://github.com/vladov3000/recast_workflow.git
pip install ./recast_workflow
This should add recast-wf to your path.
Creating a Workflow
recast-cli is essentially an automated Yadage workflow creation/run tool (see later sections for details on Yadage – we’ll need to know how to use it when we preserve our analysis). To begin, run recast-wf make new. A list of possible workflows combining various tools (such as rivet, madgraph, and contur) should be shown.
Recast-cli Catalogue
Recast-cli organizes the various physics tools into several ‘steps’ (see figure below). For each step, you can choose which tool you would like to use and specify the relevant settings.
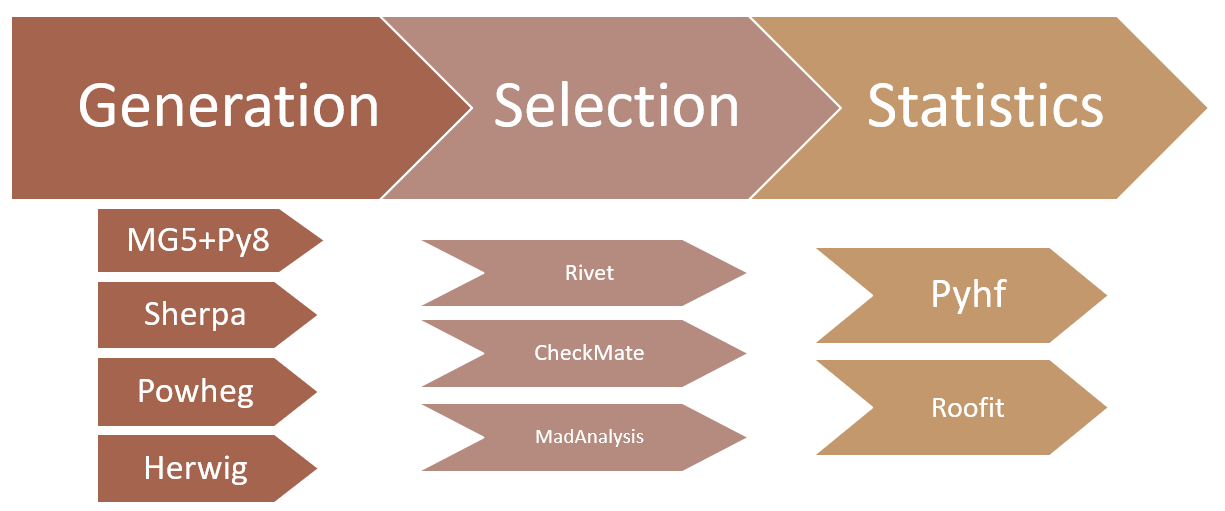
Before selecting a combination, you can enter additional ‘common inputs’. In this case, we need to enter the inspire ID of the analysis we want to use. recast-cli will automatically query the databases of the tools in the ‘selection’ step to determine which ones have implemented this analysis and filter the available combinations accordingly. To continue, enter:
analysis_id=ATLAS_2016_I1458270
done
Next, enter the number corresponding to the combination that includes madgraph_pythia, rivet and contur. Save it to inventory and show it.
Running a Workflow
Your identified workflow should now be in the inventory. To confirm, run recast-wf inv ls; you should see madgraph_pythia-rivet-contur. To retrieve it from the inventory, run:
recast-wf inv getdir madgraph_pythia-rivet-contur .
cd madgraph_pythia-rivet-contur
ls
This copies the workflow into a madgraph_pythia-rivet-contur directory within your current directory. You should see three items:
inputs run.sh workflows
workflows/workflow.yml contains the full Yadage workflow that was previously generated. run.sh is a helper script that contains the necessary Yadage command to run the workflow. inputs is where you should place all of your input files. It also contains an input.yml file that maps input names to values. Open input.yml. It should look like this:
      analysis_id: null
      n_events: null
      proc_card: null
These are the inputs that need to be specified for this workflow. analysis_id we already know should be ATLAS_2016_I1458270. For n_events, let’s choose 1000. proc_card is a madgraph process card; we need to specify the process we would like to generate. Enter proc_card_dm.dat; we’ll create this file in a moment. Note that all paths are relative to the inputs directory. With all the inputs specified, it should look like this:
      analysis_id: ATLAS_2016_I1458270
      n_events: 1000
      proc_card: proc_card_dm.dat
With this done, make proc_card_dm.dat in the inputs directory. To simulate a mono-jet DM process, write the following:
        import model DMsimp_s_spin1 --modelname
        generate p p > xd xd~ j
With the inputs specified, run run.sh:
cd ..
./run.sh
Results
The results of the run are in workdir. In workdir/contur/ANALYSIS/Summary.txt you can view the CLs:
Run Information
Contur is running in /contur on analysis objects in ['/mnt/c/Users/alexj/work/atlas_computing_workshop/recast_workflow_tutorial/madgraph_pythia-rivet-contur/workdir/rivet/rivet_analysis.yoda']
Excluding Higgs to WW measurements
Building all available data correlations, combining bins where possible
Building default background model from data, ignoring optional theory predictions (excluding ratios)

Parameter values not known for this run.
Combined exclusion for these plots is 97.85 %

pools
ATLAS_13_METJET
0.97852174284
/ATLAS_2016_I1458270/2jm
Key Points
recast-cli utilizes fast simulation and public tools.
Unlike recast-atlas, recast-cli handles generation of events.
A catalogue of different tools are available that you can select from.