Intermezzo: Yadage Helloworld
Overview
Teaching: 10 min
Exercises: 20 minQuestions
What is the syntax to define a basic yadage workflow?
Objectives
Get acquainted with a simple helloworld yadage workflow.
Learn about some of the dubugging tools that are at your disposal for developing workflows.
Introduction
In this intermezzo, we’ll take our first step of workflow authoring by walking through a simple helloworld example that illustrates the yadage syntax involved. The original example, written by Lukas Heinrich, is available here: Getting Started Tutorial. Once you’ve mastered this basic workflow, it should be relatively straightforward to extend it to more complex workflows.
High-level
recast-atlasToolIn this tutorial, we focus on developing skills for encoding your workflow with yadage syntax, and use yadage commands directly to test and run the workflow. Lukas Heinrich has also written a really nice high-level wrapper for running yadage called recast-atlas to help facilitate running the workflow, with the ability to encode unit tests and different run configurations in the
recast.ymlsteering file. See this recast tutorial for instructions and examples for developing your workflow with thisrecast-atlastool!
Yadage setup
Yadage is available as both a pip package and a docker container image with yadage pre-installed. To avoid any difficulties with installation, let’s run with the container.
First, pull the container from docker hub:
docker pull yadage/yadage
Now, if you want to use yadage commands in your directory, you can start the yadage container in the directory and bind-mount the directory contents and your docker daemon to the container with the following command:
docker run --rm -it -e PACKTIVITY_WITHIN_DOCKER=true -v $PWD:$PWD -w $PWD -v /var/run/docker.sock:/var/run/docker.sock yadage/yadage sh
Helloworld Workflow
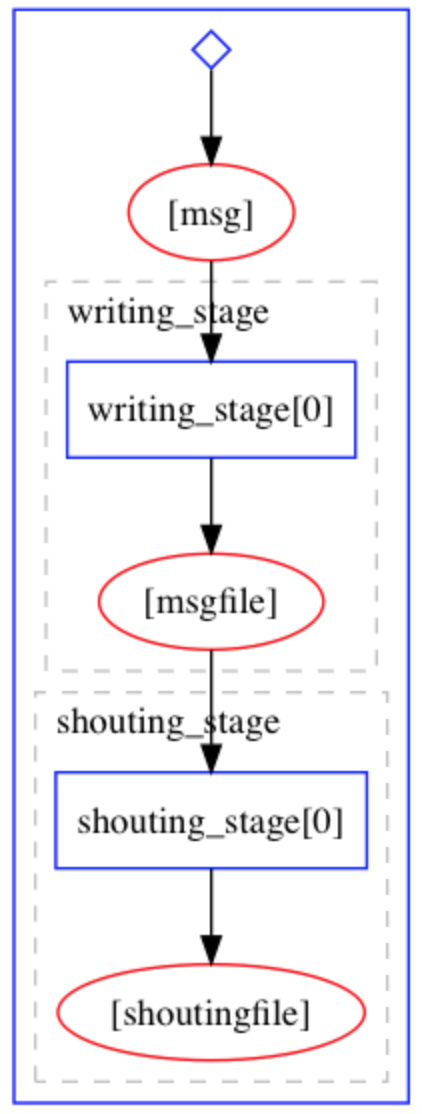
The goal of the workflow is to take an input message, concatenate it with another (fixed) message, and then capitalize the new concatenated message and output it to a file. This is accomplished in two steps, as shown in the following workflow diagram:
The containers containing the environment and executables needed to run the two steps are already available on docker hub. For the purpose of writing our workflow, we’re not really concerned with the code that actually produces the executables. All we need to know is how to run them inside their respective containers.
- https://hub.docker.com/r/yadage/tutorial-messagewriter/: contains an executable that takes a message and a path to an output file, concatenates the message onto
Hello, the message was:, and writes the new message to the output file. Try running it yourself:
docker run --rm -it -v $PWD:/workdir yadage/tutorial-messagewriter sh
/code/message_writer hello /workdir/outputfile.txt
Exit the container and check that your working directory now has a file outputfile.txt, which has some text written in it.
exit
cat outputfile.txt
- https://hub.docker.com/r/yadage/tutorial-uppermaker/: contains a python script that takes paths to input and output files as command line arguments. It capitalizes the contents of the input file and writes the result to an output file. Let’s try this out:
docker run --rm -it -v $PWD:/workdir yadage/tutorial-uppermaker sh
python /code/uppermaker.py /workdir/outputfile.txt /workdir/capped_output.txt
Exit the container and confirm that your working directory now has a file capped_output.txt containing the capitalized text.
exit
cat capped_output.txt
The workflow we’re about to construct basically automates the procedure we just went through by hand.
Steps
The two steps in our workflow are encoded in a yaml file steps.yml. Make a directory named workflow somewhere on your computer, and create an empty file named steps.yml in it.
mkdir workflow
cd workflow
touch steps.yml
In another shell, cd into this directory and start the yadage container in which you’ll run yadage commands (eg. packtivity-validate, yadage-run, etc.):
docker run --rm -it -e PACKTIVITY_WITHIN_DOCKER=true -v $PWD:$PWD -w $PWD -v /var/run/docker.sock:/var/run/docker.sock yadage/yadage sh
Message Writing Step
Paste the following into your steps.yml file:
messagewriter:
  process:
    process_type: interpolated-script-cmd
    script: |
      /code/message_writer '{message}' {outputfile}
  publisher:
    publisher_type: interpolated-pub
    publish:
      msgfile: '{outputfile}'
  environment:
    environment_type: docker-encapsulated
    image: yadage/tutorial-messagewriter
This code fully describes the first step of taking the input message and using the message_writer executable to produce the output file. Let’s look at the three components separately:
-
process: specifies the type and content of the process that the container will run. Theinterpolated-script-cmdtype means that it runs a bash script that can include variables denoted by {curly brackets}. -
publisher: specifies how the output of the step will be published (in this caseinterpolated-pub), and what variable(s) it will be published to. -
environment: indicates that the script will be run inside a docker container produced from the base imageyadage/tutorial-messagewriter.
You can use the packtivity-validate command to check that we wrote this specification correctly:
packtivity-validate steps.yml#/messagewriter
packtivity definition is valid
We can now use a great debugging tool called packtivity-run to try executing the task as a standalone packtivity, specifying both the message and the location of the output file:
packtivity-run steps.yml#/messagewriter -p message="Hi there." -p outputfile="'{workdir}/outputfile.txt'"
Check that a file outputfile.txt has been produced in the current directory with the expected output:
cat outputfile.txt
Note that you’ll need to remove the _packtivity directory before running the packtivity-run command again, otherwise the command will crash with a message like this:
w134-87-144-175:workflow danikam$ packtivity-run steps.yml#/messagewriter -p message="Hi there." -p outputfile="'{workdir}/outputfile.txt'"
<TypedLeafs: {'msgfile': '/Users/danikamacdonell/workflow/outputfile.txt'}> (prepublished)
2019-08-06 11:39:06,301 | pack.packtivity_sync |   INFO | starting file logging for topic: step
2019-08-06 11:39:07,704 | pack.packtivity_sync | WARNING | cid file /Users/danikamacdonell/workflow/_packtivity/packtivity_syncbackend.cid seems to exist, container execution will crash
Shouting Step
Now, add the following to your steps.yml file to describe the second step which will take the file produced by the first step, and write the capitalized contents to an output file.
uppermaker:
  process:
    process_type: interpolated-script-cmd
    script: |
      python /code/uppermaker.py {inputfile} {outputfile}
  publisher:
    publisher_type: interpolated-pub
    publish:
      shoutingfile: '{outputfile}'
  environment:
    environment_type: docker-encapsulated
    image: yadage/tutorial-uppermaker
You can validate and test this step using the same packtivity-validate and packtivity-run tools as before, where the packtivity-run command would be:
packtivity-run steps.yml#/uppermaker -p inputfile="'{workdir}/outputfile.txt'" -p outputfile="'{workdir}/capped_output.txt'"
Debugging Hint
When
packtivity-runfails and crashes, the info in its core dump can sometimes be a little cryptic. But if you look in the_packtivitydirectory that gets created when you runpacktivity-run, you’ll find several log files, and usually one of them (oftenpacktivity_syncbackend.run.log) will be able to point you to the cause of the crash.
Workflow
Now we can combine the two steps specified above together to form the full workflow. Create a new file named workflow.yml, and paste the following into it:
stages:
- name: writing_stage
  dependencies: [init]
  scheduler:
    scheduler_type: singlestep-stage
    parameters:
      message: {step: init, output: msg}
      outputfile: '{workdir}/outputfile.txt'
    step: {$ref: 'steps.yml#/messagewriter'}
- name: shouting_stage
  dependencies: [writing_stage]
  scheduler:
    scheduler_type: singlestep-stage
    parameters:
      inputfile: {step: writing_stage, output: msgfile}
      outputfile: '{workdir}/capped_output.txt'
    step: {$ref: 'steps.yml#/uppermaker'}
Each stage in the workflow specifies:
- its
dependencies- i.e. which stage(s) it receives input from, and which will therefore need to complete before the stage in question can start running. The [init] stage represents any input that comes from the user when the workflow is started. - The type
scheduler_typeof scheduler it needs to run. This could be either asinglestep-stageor amultistep-stage(we’ll only consider single-step stages in this tutorial). - The
parameters- i.e. how to obtain the input and write the output for the step. - And, of course, which
stepit needs to run.
Validating and Running
Finally, let’s validate the workflow using the yadage-validate command line tool:
yadage-validate workflow.yml
If there are no errors, we can go ahead and try running the full yadage workflow with yadage-run:
yadage-run workdir workflow.yml -p msg='Hi there.'
If the workflow runs successfully, you should find the file capped_output.txt in the workdir/shouting_stage directory, with the following content:
HELLO, THE MESSAGE WAS: HI THERE.
Note that, as with the packtivity-run command, you’ll need to remove the workdir directory produced by the yadage-run command before you can re-run the command.
Debugging Hint
As with
packtivity-run, theyadage-runcommand also produces log files for each step that can be super handy for debugging. These are located in the respective_packtivitydirectory for each step. For example, the log files for the secondshouting_stagestep are located inworkdir/shouting_stage/_packtivity/.
Key Points
The format and syntax for defining yadage workflows takes some getting used to.
Yadage includes some very handy validation and debugging tools for developing your steps and workflow.
The good news is that the basic workflow we’ve written here probably showcases most of the syntax you’ll need to write a full RECAST workflow.